Set up Notification Triggers
Creating Notifications for Graph Changes with Fuze
In this tutorial we'll learn how to write and set up a Fuze notification policy that will trigger when a specified change is captured in the graph, sending a notification to a user inbox.
Fuze captures changes in the graph and sends them to a message broker to be routed, transformed, and/or processed. GraphGrid currently supports three message broker types: RabbitMQ, S3, and Kafka.
Graph changes are sent as JSON transactional event data or txData. txData is read via graph queries, (Geequel), that have been
defined in a Fuze policy. To set up notifications for graph changes, we need to create a notification policy that instructs Fuze to look for the data
changes we want to be notified of; and route them to the com.graphgrid.ingest queue where Publish will handle creating a Notification node that is
connected to a user inbox.
Write a notification policy
To set up notifications, we need to write and activate a notification policy. This policy instructs Fuze where to route the txData and what events trigger
certain actions.
Here is an example of a complete notification policy:
{
    "metadata": {
        "description": "On RabbitMQ, forward messages to rabbitmq publish queue for notifications.",
        "displayName": "tutorial-notification-policy",
        "createdAt": "2019-10-23T18:09:52+00:00",
        "updatedAt": "2019-10-23T18:09:53+00:00",
        "versions": null
    },
    "listeningBrokerEndpoint": {
        "broker": "RABBITMQ",
        "exchange": "com.graphgrid.fuze.exchange",
        "exchangeType": "topic",
        "routingKey": "com.graphgrid.fuze.key",
        "durable": true,
        "exclusive": false,
        "autoDelete": false,
        "queue": "com.graphgrid.fuze.queue",
    },
    "forwardingRules": [{
        "cypher": "WITH {txData} AS txData WITH txData.assignedNodeProperties.byLabel.Person AS event, txData UNWIND KEYS(event) AS key WITH key,event[key] AS changes UNWIND changes AS change WITH change WHERE change.value = '\''Employee'\'' AND change.key = '\''title'\'' MERGE (n:NotificationType {name:'\''in-app'\''}) ON CREATE SET n.grn = '\''grn:gg:'\'' + toLower(head(labels(n))) + '\'':'\'' + apoc.create.uuid() WITH n MATCH (u:User) WITH DISTINCT {userGrns: COLLECT(u.grn),message: '\''An Aldi employee shopped here today!'\'',title: '\''Employee Shopper'\'', notificationTypeGrn: n.grn} AS results RETURN results",
        "resultKey": "results",
        "multicast": {
            "retry": 0,
            "stopOnFailure": false,
            "brokers": [{
                "broker": "RABBITMQ",
                "exchange": "com.graphgrid.ingest",
                "routingKey": "publish.key",
                "durable": true,
                "exclusive": false,
                "autoDelete": false,
                "queue": "com.graphgrid.ingest",
            }]
        }
    }],
    "neo4jCredentials": {
        "uri": "bolt://ongdb:7687",
        "username": "ongdb",
        "password": "admin"
    }
}
A notification policy consists of 4 parts, metadata, listeningBrokerEndpoint, forwardingRules, and neo4jCredentials. The upcoming headings will
describe each and provide some examples!
metadata
The metadata section of the notification policy holds information about the policy, like its name and when it was created.
{
    "metadata": {
        "description": "On RabbitMQ, forward messages to rabbitmq publish queue for notifications.",
        "displayName": "tutorial-notification-policy",
        "createdAt": "2019-10-23T18:09:52+00:00",
        "updatedAt": "2019-10-23T18:09:53+00:00",
        "versions": null
    }
}
listeningBrokerEndpoint
The listeningBrokerEndpoint is where the Fuze RabbitMQ is "hooked up" to our policy. You won't need to do any customizing here unless you want to configure any
of the broker properties.
{
  "listeningBrokerEndpoint": {
        "broker": "RABBITMQ",
        "exchange": "com.graphgrid.fuze.exchange",
        "exchangeType": "topic",
        "routingKey": "com.graphgrid.fuze.key",
        "durable": true,
        "exclusive": false,
        "autoDelete": false,
        "queue": "com.graphgrid.fuze.queue"
}
forwardingRules
The forwardingRules section is the most robust section of a notification policy, and for good reason! Here we define the graph events (changes) that should
trigger Fuze to send a message to the correct queue in order to create a notification.
Routing to the correct queue
Fuze uses RabbitMQ as its default message broker. To create a notification, we need to forward a message to the com.graphgrid.ingest exchange and queue.
The Publish module pulls messages from the com.graphgrid.ingest queue.
This part of the policy should look like this:
      "brokers": [{
                "broker": "RABBITMQ",
                "exchange": "com.graphgrid.ingest",
                "routingKey": "publish.key",
                "durable": true,
                "exclusive": false,
                "autoDelete": false,
                "queue": "com.graphgrid.ingest"
      }]
Constructing the forwardingRules graph query
The graph changes, or events, that we want to capture are defined by Geequel queries within the forwardingRules section of the policy. The query tells Fuze
what graph changes to look for and what data to collect in order to create an object that can be sent to Publish to be used to create a notification. This data
is stored as txData which is sent by Fuze to the Publish message broker queue (com.graphgrid.ingest).
We can think of Fuze like a 911 operator. Fuze listens for an emergency (an event or change), collects the information (data), and dispatches instructions based on the appropriate authorities (modules). This is all set up using this Geequel query!
Accessing the properties of txData
The first part of our query should define the event that we want to trigger a notification. To do this we need to access and unwind the txData. Here
is an example of txData created by adding a simple Person node added to the graph:
If we were to create a Person node with this data in the graph:
CREATE (p:Resouce:Person)
SET p.grn = "grn:gg:person:inAo9SoaSeY0t7lUxQ1mOEsvnERWTGC17qzLQRvwTPex"
SET p.name = "Bob"
SET p.born = "1995"
SET p.title = "Employee"
This txData would be produced from it:
{
    "assignedLabels": {
        "byLabel": {
            "Person": [{
                "nodeUid": "`Resource`:`grn`:`grn:gg:person:inAo9SoaSeY0t7lUxQ1mOEsvnERWTGC17qzLQRvwTPex`",
                "action": "ADDED"
            }]
        },
        "byUid": {
            "`Resource`:`grn`:`grn:gg:person:inAo9SoaSeY0t7lUxQ1mOEsvnERWTGC17qzLQRvwTPex`": ["Person"]
        }
    },
    "removedLabels": {
        "byLabel": {},
        "byUid": {}
    },
    "deletedNodes": {},
    "deletedRelationships": {},
    "assignedRelationshipProperties": {
        "byUid": {},
        "byKey": {},
        "byType": {}
    },
    "commitTime": 1658768095093,
    "createdRelationships": {},
    "removedNodeProperties": {
        "byLabel": {},
        "byUid": {},
        "byKey": {}
    },
    "removedRelationshipProperties": {
        "byUid": {},
        "byKey": {},
        "byType": {}
    },
    "assignedNodeProperties": {
        "byLabel": {
            "GraphGridResource": {
                "`Resource`:`grn`:`grn:gg:person:inAo9SoaSeY0t7lUxQ1mOEsvnERWTGC17qzLQRvwTPex`": [{
                    "action": "ADDED",
                    "oldValue": null,
                    "type": "String",
                    "value": "Employee",
                    "key": "title"
                }, {
                    "action": "ADDED",
                    "oldValue": null,
                    "type": "Long",
                    "value": 1995,
                    "key": "born"
                }, {
                    "action": "ADDED",
                    "oldValue": null,
                    "type": "String",
                    "value": "Bob",
                    "key": "name"
                }]
            },
            "Resource": {
                "`Resource`:`grn`:`grn:gg:person:inAo9SoaSeY0t7lUxQ1mOEsvnERWTGC17qzLQRvwTPex`": [{
                    "action": "ADDED",
                    "oldValue": null,
                    "type": "String",
                    "value": "Employee",
                    "key": "title"
                }, {
                    "action": "ADDED",
                    "oldValue": null,
                    "type": "Long",
                    "value": 1995,
                    "key": "born"
                }, {
                    "action": "ADDED",
                    "oldValue": null,
                    "type": "String",
                    "value": "Bob",
                    "key": "name"
                }]
            },
            "Person": {
                "`Resource`:`grn`:`grn:gg:person:inAo9SoaSeY0t7lUxQ1mOEsvnERWTGC17qzLQRvwTPex`": [{
                    "action": "ADDED",
                    "oldValue": null,
                    "type": "String",
                    "value": "Employee",
                    "key": "title"
                }, {
                    "action": "ADDED",
                    "oldValue": null,
                    "type": "Long",
                    "value": 1995,
                    "key": "born"
                }, {
                    "action": "ADDED",
                    "oldValue": null,
                    "type": "String",
                    "value": "Bob",
                    "key": "name"
                }]
            }
        },
        "byUid": {
            "`Resource`:`grn`:`grn:gg:person:inAo9SoaSeY0t7lUxQ1mOEsvnERWTGC17qzLQRvwTPex`": [{
                "action": "ADDED",
                "oldValue": null,
                "type": "String",
                "value": "Employee",
                "key": "title"
            }, {
                "action": "ADDED",
                "oldValue": null,
                "type": "Long",
                "value": 1995,
                "key": "born"
            }, {
                "action": "ADDED",
                "oldValue": null,
                "type": "String",
                "value": "Bob",
                "key": "name"
            }]
        },
        "byKey": {
            "born": ["`Resource`:`grn`:`grn:gg:person:inAo9SoaSeY0t7lUxQ1mOEsvnERWTGC17qzLQRvwTPex`"],
            "name": ["`Resource`:`grn`:`grn:gg:person:inAo9SoaSeY0t7lUxQ1mOEsvnERWTGC17qzLQRvwTPex`"],
            "title": ["`Resource`:`grn`:`grn:gg:person:inAo9SoaSeY0t7lUxQ1mOEsvnERWTGC17qzLQRvwTPex`"]
        }
    },
    "createdNodes": {
        "`Resource`:`grn`:`grn:gg:person:inAo9SoaSeY0t7lUxQ1mOEsvnERWTGC17qzLQRvwTPex`": {
            "action": "ADDED"
        }
    },
    "transactionId": 125
}
Notice we're adding a Person node with several properties like born, name, and title.
This information is represented redundantly within the txData, allowing for ease of access when writing Geequel queries.
You can access specific aspects of the written data through the different JSON keys like createdNodes (to get which nodes were created) and
assignedNodeProperties (to get the properties assigned to the node).
Depending on what you want to be notified of, you'll need to know what is being stored in your txData.
To follow along with this tutorial, we'll set a static example of txData as a param in ONgDB. This is for tutorial purposes only, in order to get a
better idea of how to use/access data within txData.
The txData stored by actual changes to the graph will not be stored under this parameter. To view real-time txData see the
Access RabbitMQ section.
:param {txData:{"assignedLabels":{"byLabel":{"Person":[{"nodeUid":"`Resource`:`grn`:`grn:gg:person:inAo9SoaSeY0t7lUxQ1mOEsvnERWTGC17qzLQRvwTPex`","action":"ADDED"}]},"byUid":{"`Resource`:`grn`:`grn:gg:person:inAo9SoaSeY0t7lUxQ1mOEsvnERWTGC17qzLQRvwTPex`":["Person"]}},"removedLabels":{"byLabel":{},"byUid":{}},"deletedNodes":{},"deletedRelationships":{},"assignedRelationshipProperties":{"byUid":{},"byKey":{},"byType":{}},"commitTime":1658768095093,"createdRelationships":{},"removedNodeProperties":{"byLabel":{},"byUid":{},"byKey":{}},"removedRelationshipProperties":{"byUid":{},"byKey":{},"byType":{}},"assignedNodeProperties":{"byLabel":{"GraphGridResource":{"`Resource`:`grn`:`grn:gg:person:inAo9SoaSeY0t7lUxQ1mOEsvnERWTGC17qzLQRvwTPex`":[{"action":"ADDED","oldValue":null,"type":"String","value":"Employee","key":"title"},{"action":"ADDED","oldValue":null,"type":"Long","value":1995,"key":"born"},{"action":"ADDED","oldValue":null,"type":"String","value":"Bob","key":"name"}]},"Resource":{"`Resource`:`grn`:`grn:gg:person:inAo9SoaSeY0t7lUxQ1mOEsvnERWTGC17qzLQRvwTPex`":[{"action":"ADDED","oldValue":null,"type":"String","value":"Employee","key":"title"},{"action":"ADDED","oldValue":null,"type":"Long","value":1995,"key":"born"},{"action":"ADDED","oldValue":null,"type":"String","value":"Bob","key":"name"}]},"Person":{"`Resource`:`grn`:`grn:gg:person:inAo9SoaSeY0t7lUxQ1mOEsvnERWTGC17qzLQRvwTPex`":[{"action":"ADDED","oldValue":null,"type":"String","value":"Employee","key":"title"},{"action":"ADDED","oldValue":null,"type":"Long","value":1995,"key":"born"},{"action":"ADDED","oldValue":null,"type":"String","value":"Bob","key":"name"}]}},"byUid":{"`Resource`:`grn`:`grn:gg:person:inAo9SoaSeY0t7lUxQ1mOEsvnERWTGC17qzLQRvwTPex`":[{"action":"ADDED","oldValue":null,"type":"String","value":"Employee","key":"title"},{"action":"ADDED","oldValue":null,"type":"Long","value":1995,"key":"born"},{"action":"ADDED","oldValue":null,"type":"String","value":"Bob","key":"name"}]},"byKey":{"born":["`Resource`:`grn`:`grn:gg:person:inAo9SoaSeY0t7lUxQ1mOEsvnERWTGC17qzLQRvwTPex`"],"name":["`Resource`:`grn`:`grn:gg:person:inAo9SoaSeY0t7lUxQ1mOEsvnERWTGC17qzLQRvwTPex`"],"title":["`Resource`:`grn`:`grn:gg:person:inAo9SoaSeY0t7lUxQ1mOEsvnERWTGC17qzLQRvwTPex`"]}},"createdNodes":{"`Resource`:`grn`:`grn:gg:person:inAo9SoaSeY0t7lUxQ1mOEsvnERWTGC17qzLQRvwTPex`":{"action":"ADDED"}},"transactionId":125}}```
Tutorial example
Let's say we have a database that collects the names of people who have shopped at Aldi on any given day. Each shopper is stored in the graph as a Person
node that has a property name, for their name, and a property title of either "Customer" or "Employee".
We're interested in being notified whenever an employee of Aldi shops there. To create this we need to access the Person node properties. We can do
this by accessing the assignedNodeProperties property within the txData. Note that the data will only show in assignedNodeProperties if a property on
the target (in our case Person) node is changed. The Fuze notification policy must first be saved and activated in order for Fuze to capture changes as
txData. For the purpose of this tutorial we're using a static sample of txData, but in actual use a target node would either need to be created or have
its properties updated in order for the data to show in the txData.
Get txData from RabbitMQ
We know that we need to access the assignedNodeProperties within the txData in order to define our change event. In order to access the information of a Person
node we need to access the information nested under the key byLabel.
Accessing txData is sort of like accessing files in a directory. To put it into the context of files it would look like this:
txData > assignedNodeProperties > byLabel > Person. Another way to think about accessing the data within txData is using it as a Geequel map.
Using these concepts, we'll access the property data in our Geequel query. We'll store this data as a variable that we can use in the rest of our query.
WITH {txData} AS txData WITH txData.assignedNodeProperties.byLabel.Person AS event
We're taking in our param txData (our example JSON transaction data), and setting it as a variable txData, then accessing its nested
properties and storing them as a variable called event.
If you saved the txData from above as a param, try out this query in ONgDB:
WITH {txData} AS txData WITH txData.assignedNodeProperties.byLabel.Person AS event RETURN event
This query should return "contents" of the Person "file" (map key), or the section of the txData that includes the properties listed under Person.
{
  "`Resource`:`grn`:`grn:gg:person:inAo9SoaSeY0t7lUxQ1mOEsvnERWTGC17qzLQRvwTPex`": [
    {
      "action": "ADDED",
      "oldValue": null,
      "type": "String",
      "value": "Employee",
      "key": "title"
    },
    {
      "action": "ADDED",
      "oldValue": null,
      "type": "String",
      "value": "Tanjiro",
      "key": "name"
    },
    {
      "action": "ADDED",
      "oldValue": null,
      "type": "Long",
      "value": 1995,
      "key": "born"
    }
  ]
}
Since we are only interested in the title property, we need to separate each element in the list using the UNWIND clause.
The next part of our query will look like this:
UNWIND KEYS(event) AS key WITH key,event[key] AS changes UNWIND changes AS change WITH change
Try it out! Run this query in ONgDB to see that the elements listed in our txData are now three separate objects as opposed to elements in an array:
WITH {txData} AS txData WITH txData.assignedNodeProperties.byLabel.Person AS event, txData
UNWIND KEYS(event) AS key
    WITH key,event[key] AS changes
    UNWIND changes AS change
        RETURN change
Returns:
{
  "action": "ADDED",
  "oldValue": null,
  "type": "String",
  "value": "Employee",
  "key": "title"
},
{
  "action": "ADDED",
  "oldValue": null,
  "type": "String",
  "value": "Tanjiro",
  "key": "name"
},
{
  "action": "ADDED",
  "oldValue": null,
  "type": "Long",
  "value": 1995,
  "key": "born"
}
This unwinds the elements nested under the txData's Person property as key values that represent each element in the list. In our example
txData we only have one such element Resource:grn:grn:gg:person:inAo9SoaSeY0t7lUxQ1mOEsvnERWTGC17qzLQRvwTPex, but had more nodes changed
we would have multiple elements here. The elements under our key(s) are then unwound as the changes that occurred, the properties set during
the transaction. This gives us access to each property that changed on each of our nodes.
Now we can set parameters for what event data will trigger the notification by using the key value pairs of the elements that we just separated from our txData. In our case the value will be "Employee" and the key will be "title".
WITH change WHERE change.value = "Employee" AND change.key = "title"
If we return our changes again but now with our custom query parameters we should see only the relevant txData is returned:
WITH {txData} AS txData WITH txData.assignedNodeProperties.byLabel.Person AS event, txData
UNWIND KEYS(event) AS key
    WITH key, event[key] AS changes
    UNWIND changes AS change
    WITH change WHERE change.value = 'Employee' AND change.key = 'title'
        RETURN change
Returns:
{
  "action": "ADDED",
  "oldValue": null,
  "type": "String",
  "value": "Employee",
  "key": "title"
}
Now our query successfully isolates the property we need!
The last part of our query involves creating the actual notification.
MERGE (n:NotificationType {name:'in-app'}) ON CREATE SET n.grn = 'grn:gg:' + toLower(head(labels(n))) + ':' + apoc.create.uuid()
WITH n MATCH (u:User) WITH DISTINCT {userGrns: COLLECT(u.grn),message: 'An Aldi employee shopped here today!',title: 'Employee Shopper', notificationTypeGrn: n.grn} AS results
RETURN results
Here we are retrieving NotificationType grn that will be pulled to Publish via the
com.graphgrid.ingest queue. Publish recognizes a few different notification types:
in-app, voip-push-notification, and push-notification. The voip-push-notification
and push-notification types will attempt to send through AWS. The in-app type does not
attempt an actual send. It is recommended to use the in-app type as we do here if you're
not running GraphGrid with AWS/SNS.
The first part of the query sets the type of notification, then gathers all the data we need like the user grn, and any data that we want to
store in the object. It's a good idea to include a property for the notification message and title. RETURN results
sends the object to Publish which uses the object to create a Notification node. It is important to note that the returned variable name,
in our case results, should match the name of provided in the resultKey in the Fuze policy.
   "forwardingRules": [{
        "cypher": "WITH {txData} AS txData WITH txData.assignedNodeProperties.byLabel.Person AS event, txData UNWIND KEYS(event) AS key WITH key,event[key] AS changes UNWIND changes AS change WITH change WHERE change.value = '\''Employee'\'' AND change.key = '\''title'\'' MERGE (n:NotificationType {name:'\''in-app'\''}) ON CREATE SET n.grn = '\''grn:gg:'\'' + toLower(head(labels(n))) + '\'':'\'' + apoc.create.uuid() WITH n MATCH (u:User) WITH DISTINCT {userGrns: COLLECT(u.grn),message: '\''An Aldi employee shopped here today!'\'',title: '\''Employee Shopper'\'', notificationTypeGrn: n.grn} AS results RETURN results",
        "resultKey": "results",
   ]}
If we run our now completed query:
WITH {txData} AS txData WITH txData.assignedNodeProperties.byLabel.Person AS event, txData
UNWIND KEYS(event) AS key
    WITH key,event[key] AS changes
    UNWIND changes AS change
    WITH change WHERE change.value = 'Employee' AND change.key = 'title'
    MERGE (n:NotificationType {name:'in-app'})
    ON CREATE SET n.grn = 'grn:gg:' + toLower(head(labels(n))) + ':' + apoc.create.uuid()
    WITH n MATCH (u:User)
    WITH DISTINCT {userGrns: COLLECT(u.grn),message: 'An Aldi employee shopped here today!',title: 'Employee Shopper', notificationTypeGrn: n.grn} AS results
        RETURN results
We should get the notification results:
{
  "userGrns": [
    "grn:gg:user:EeTO5wqULpuk1Xr8T8JQ2VcT5075cTvAWdmpjEDXnl9W"
  ],
  "message": "An Aldi employee shopped here today!",
  "title": "Employee Shopper",
  "notificationTypeGrn": "grn:gg:notificationtype:f489eb2c-0618-40b8-8c1a-12a9677c44c6"
}
If the notification is going to be sent through AWS (voip-push-notification or push-notification) the notificationTypeGrn, userGrns, message,
and title are all required parameters for the Notification node.
Once Publish receives the txData sent by Fuze, it grabs the grn of the
NotificationType node which gets passed in to Publish. Publish recognizes the
NotificationType object and creates a Notification node. The Notification
node connects to a UserInbox node via a relationship called SENT.
Graph database credentials
The fourth and final part of the notification policy is for validating our graph database credentials. Here we're linking Fuze to the graph that we want to capture changes on.
The default ONgDB bolt server is located at port 7687 so the uri required for Fuze to connect is bolt://ongdb:7687. Either enter the default username
"ongdb" and password "admin" or the credentials you have chosen and configured for your local ONgDB instance.
    "neo4jCredentials": {
        "uri": "bolt://ongdb:7687",
        "username": "ongdb",
        "password": "admin"
    }
Complete Notification Policy
Here is the completed notification policy:
{
    "metadata": {
        "description": "On RabbitMQ, forward messages to rabbitmq publish queue for notifications.",
        "displayName": "tutorial-notification-policy",
        "createdAt": "2019-10-23T18:09:52+00:00",
        "updatedAt": "2019-10-23T18:09:53+00:00",
        "versions": null
    },
    {
  "listeningBrokerEndpoint": {
        "broker": "RABBITMQ",
        "exchange": "com.graphgrid.fuze.exchange",
        "exchangeType": "topic",
        "routingKey": "com.graphgrid.fuze.key",
        "durable": true,
        "exclusive": false,
        "autoDelete": false,
        "queue": "com.graphgrid.fuze.queue"
}
    },
    "forwardingRules": [{
        "cypher": "WITH {txData} AS txData WITH txData.assignedNodeProperties.byLabel.Person AS event, txData UNWIND KEYS(event) AS key WITH key,event[key] AS changes UNWIND changes AS change WITH change WHERE change.value = '\''Employee'\'' AND change.key = '\''title'\'' MERGE (n:NotificationType {name:'\''in-app'\''}) ON CREATE SET n.grn = '\''grn:gg:'\'' + toLower(head(labels(n))) + '\'':'\'' + apoc.create.uuid() WITH n MATCH (u:User) WITH DISTINCT {userGrns: COLLECT(u.grn),message: '\''An Aldi employee shopped here today!'\'',title: '\''Employee Shopper'\'', notificationTypeGrn: n.grn} AS results RETURN results",
        "resultKey": "results",
        "multicast": {
            "retry": 0,
            "stopOnFailure": false,
             "brokers": [{
                "broker": "RABBITMQ",
                "exchange": "com.graphgrid.ingest",
                "routingKey": "publish.key",
                "durable": true,
                "exclusive": false,
                "autoDelete": false,
                "queue": "com.graphgrid.ingest"
                }],
    "neo4jCredentials": {
        "uri": "bolt://ongdb:7687",
        "username": "ongdb",
        "password": "admin"
    }
}
Saving and activating a notification policy
Now we can save and activate the policy through the Fuze API. To set up a notification policy, we only need to use two endpoints, savePolicy and activatePolicy.
savePolicy
This endpoint allows us to pass in our notification policy to Fuze. Fuze stores our policy under the policy name set in the request's URL. Once the policy is saved, we can move on to the next step which is activating it.
curl --location --request POST "${API_BASE}/1.0/fuze/default/savePolicy/tutorial-notification-policy" \
--header "Authorization: Bearer ${BEARER_TOKEN}" \
--header 'Content-Type: application/json' \
--data-raw '{
    "metadata": {
        "description": "On RabbitMQ, forward messages to rabbitmq publish queue for notifications.",
        "displayName": "tutorial-notification-policy",
        "createdAt": "2019-10-23T18:09:52+00:00",
        "updatedAt": "2019-10-23T18:09:53+00:00",
        "versions": null
    },
    "listeningBrokerEndpoint": {
        "broker": "RABBITMQ",
        "exchange": "com.graphgrid.fuze.exchange",
        "exchangeType": "topic",
        "routingKey": "com.graphgrid.fuze.key",
        "durable": true,
        "exclusive": false,
        "autoDelete": false,
        "queue": "com.graphgrid.fuze.queue",
    },
    "forwardingRules": [{
        "cypher": "WITH {txData} AS txData WITH txData.assignedNodeProperties.byLabel.Person AS event, txData UNWIND KEYS(event) AS key WITH key,event[key] AS changes UNWIND changes AS change WITH change WHERE change.value = '\''Employee'\'' AND change.key = '\''title'\'' MERGE (n:NotificationType {name:'\''in-app'\''}) ON CREATE SET n.grn = '\''grn:gg:'\'' + toLower(head(labels(n))) + '\'':'\'' + apoc.create.uuid() WITH n MATCH (u:User) WITH DISTINCT {userGrns: COLLECT(u.grn),message: '\''An Aldi employee shopped here today!'\'',title: '\''Employee Shopper'\'', notificationTypeGrn: n.grn} AS results RETURN results",
        "resultKey": "results",
        "multicast": {
            "retry": 0,
            "stopOnFailure": false,
         "brokers": [{
                "broker": "RABBITMQ",
                "exchange": "com.graphgrid.ingest",
                "routingKey": "publish.key",
                "durable": true,
                "exclusive": false,
                "autoDelete": false,
                "queue": "com.graphgrid.ingest",
                }],
    "neo4jCredentials": {
        "uri": "bolt://ongdb:7687",
        "username": "ongdb",
        "password": "admin"
    }
}'
activatePolicy
Now that the policy is saved we'll need to activate it. Once the policy is activated Fuze begins listening and performing the event-driven triggers. We simply use the notification policy name that we used to save it, no further data is needed to activate the policy.
curl --location --request POST "${API_BASE}/1.0/fuze/default/activatePolicy/notification-policy" \
--header "Authorization: Bearer ${BEARER_TOKEN}"
Results
After activating the policy, add this node to the graph:
CREATE (p:Person {name: "Bob", title: "Employee"})
Adding this node should trigger a notification to be sent to our default user inbox. To check run this query:
MATCH (n:Notification) RETURN n
If the Notification node was created, then we have successfully written and activated a notification policy!
Notice that the Notification node contains all the properties that we defined in our policy. If we expand its relationships we can see the NotificationType
node that Publish read as an object to trigger the Notification creation. The Notification node is connected to a userInbox via the relationship SENT.

The Notification node contains all the properties that we defined in the policy. It also contains a property called status which tells you whether
the message has successfully been sent.

Testing and how to access the message queue
There may be times when you want to test that your notification policy's graph query is working properly. Testing your query before saving and activating
the policy is helpful for debugging. If you're not getting the correct results, or none at all, testing that the graph query written in your notification
policy is correct is a good first step. To do this, you'll need to access the txData in RabbitMQ and set it as a parameter in ONgDB. We'll walk through
that process in the next section.
Deactivate the notification policy
The first step is to deactivate the notification policy that you're testing. Use the deactivatePolicy endpoint, passing in the name of the policy that
you used when you saved it.
curl --location --request POST "${API_BASE}/1.0/fuze/default/deactivatePolicy/notification-policy" \
--header "Authorization: Bearer ${BEARER_TOKEN}"
Trigger Fuze
Now make the change that will be triggering a notification in the graph. For example, if we were to test our tutorial we'd add a Person node with the title property
equal to "Employee".
Access RabbitMQ
Next you'll need to access your local instance of RabbitMQ. This can be found by going to http://localhost:15672. Login in with the default username "guest" and
password which is also "guest", or if set, your chosen credentials. Once you're logged in, click on the "Queues" tab at the top of the page.
On the Queues page you click on the com.graphgrid.fuze.queue
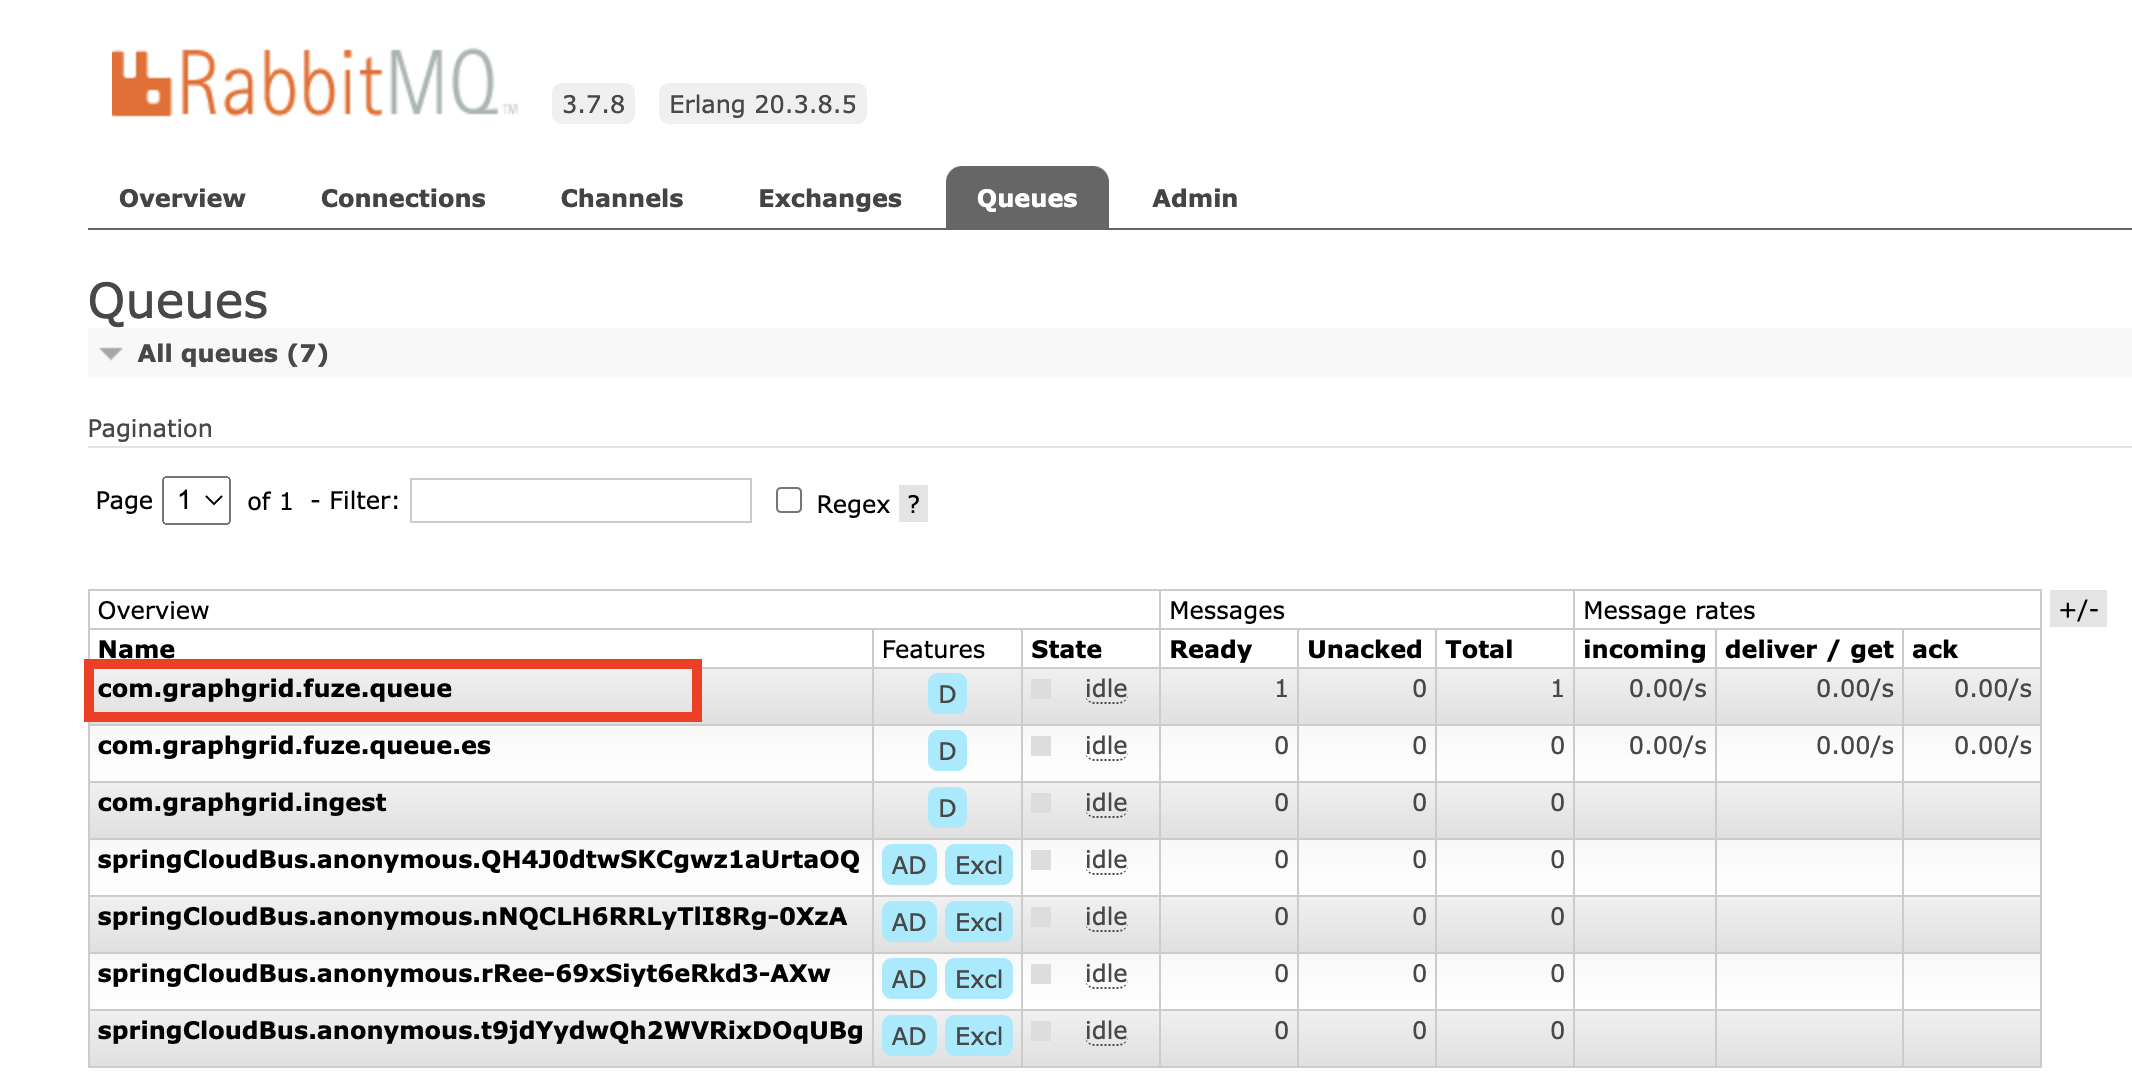
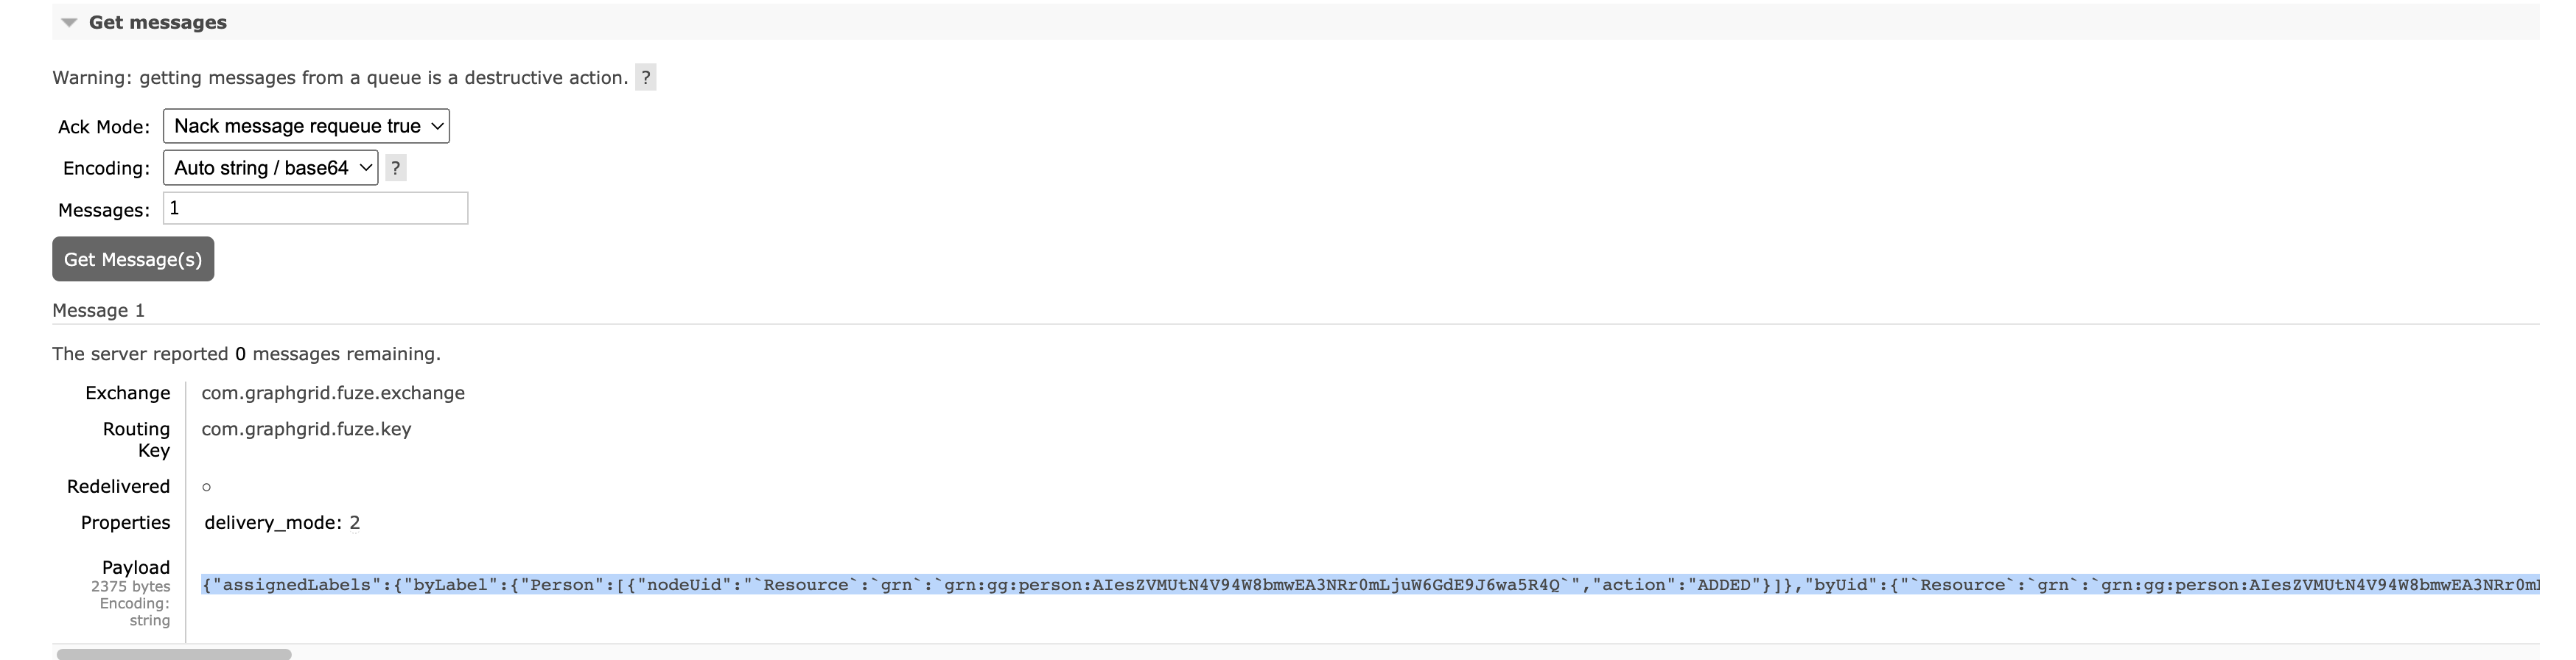
Scroll down until you see a button that says "Get Message(s)" where you should see a message stuck in the Fuze queue. Click the button to open the message.
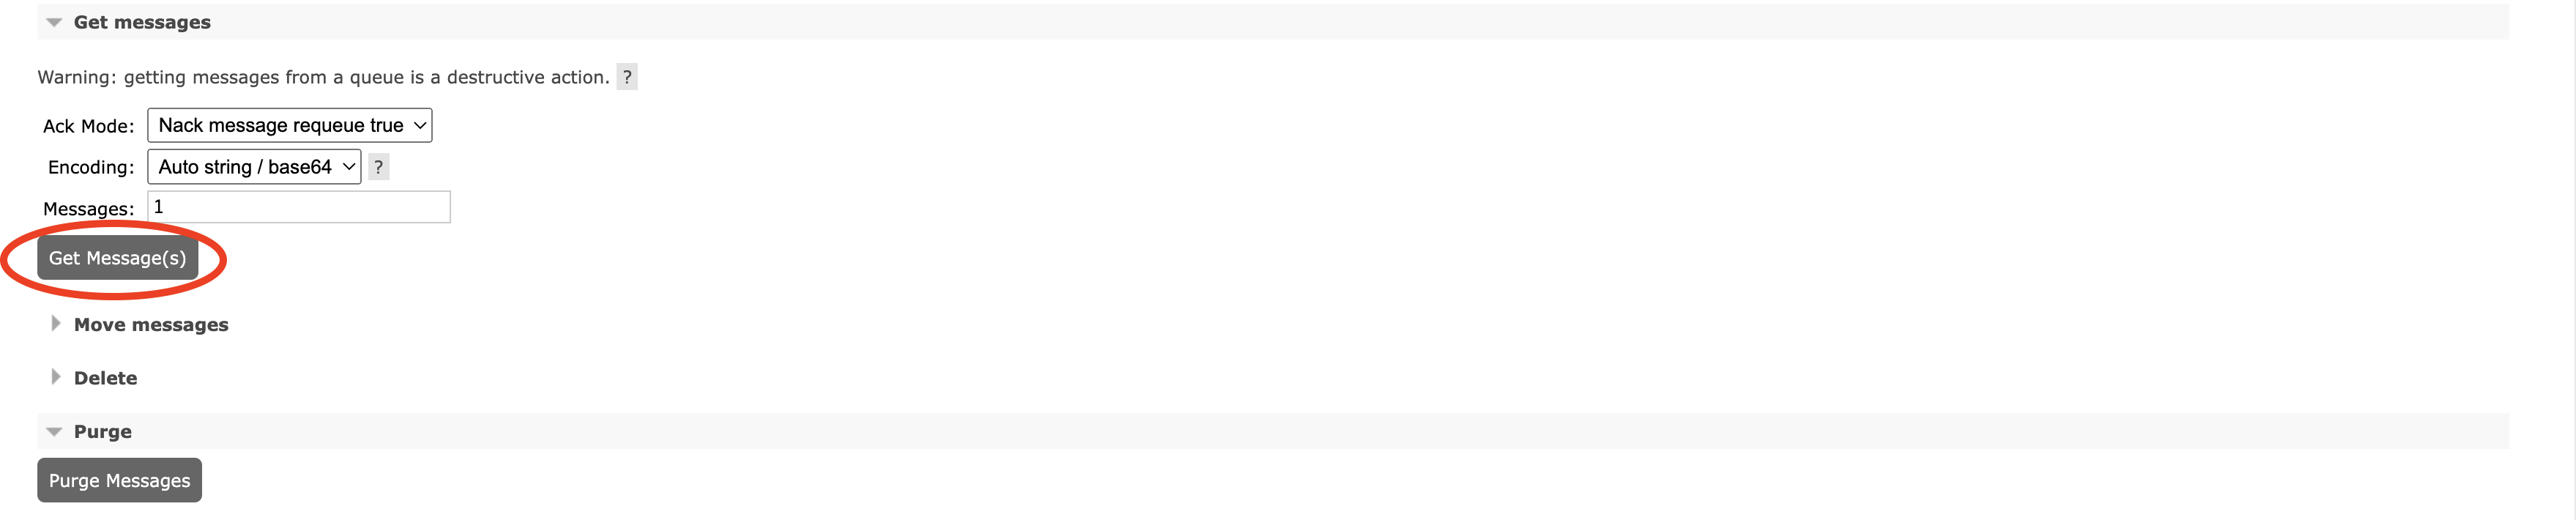
Copy the "Payload", this is your txData.
Set the txData param
Create a parameter in ONgDB called txData, by pasting the txData that you copied from the previous step :params {txData: paste txData here}. It should
look something like this:
:param {txData:{"assignedLabels":{"byLabel":{"Person":[{"nodeUid":"`Resource`:`grn`:`grn:gg:person:inAo9SoaSeY0t7lUxQ1mOEsvnERWTGC17qzLQRvwTPex`","action":"ADDED"}]},"byUid":{"`Resource`:`grn`:`grn:gg:person:inAo9SoaSeY0t7lUxQ1mOEsvnERWTGC17qzLQRvwTPex`":["Person"]}},"removedLabels":{"byLabel":{},"byUid":{}},"deletedNodes":{},"deletedRelationships":{},"assignedRelationshipProperties":{"byUid":{},"byKey":{},"byType":{}},"commitTime":1658768095093,"createdRelationships":{},"removedNodeProperties":{"byLabel":{},"byUid":{},"byKey":{}},"removedRelationshipProperties":{"byUid":{},"byKey":{},"byType":{}},"assignedNodeProperties":{"byLabel":{"GraphGridResource":{"`Resource`:`grn`:`grn:gg:person:inAo9SoaSeY0t7lUxQ1mOEsvnERWTGC17qzLQRvwTPex`":[{"action":"ADDED","oldValue":null,"type":"String","value":"Employee","key":"title"},{"action":"ADDED","oldValue":null,"type":"Long","value":1995,"key":"born"},{"action":"ADDED","oldValue":null,"type":"String","value":"Bob","key":"name"}]},"Resource":{"`Resource`:`grn`:`grn:gg:person:inAo9SoaSeY0t7lUxQ1mOEsvnERWTGC17qzLQRvwTPex`":[{"action":"ADDED","oldValue":null,"type":"String","value":"Employee","key":"title"},{"action":"ADDED","oldValue":null,"type":"Long","value":1995,"key":"born"},{"action":"ADDED","oldValue":null,"type":"String","value":"Bob","key":"name"}]},"Person":{"`Resource`:`grn`:`grn:gg:person:inAo9SoaSeY0t7lUxQ1mOEsvnERWTGC17qzLQRvwTPex`":[{"action":"ADDED","oldValue":null,"type":"String","value":"Employee","key":"title"},{"action":"ADDED","oldValue":null,"type":"Long","value":1995,"key":"born"},{"action":"ADDED","oldValue":null,"type":"String","value":"Bob","key":"name"}]}},"byUid":{"`Resource`:`grn`:`grn:gg:person:inAo9SoaSeY0t7lUxQ1mOEsvnERWTGC17qzLQRvwTPex`":[{"action":"ADDED","oldValue":null,"type":"String","value":"Employee","key":"title"},{"action":"ADDED","oldValue":null,"type":"Long","value":1995,"key":"born"},{"action":"ADDED","oldValue":null,"type":"String","value":"Bob","key":"name"}]},"byKey":{"born":["`Resource`:`grn`:`grn:gg:person:inAo9SoaSeY0t7lUxQ1mOEsvnERWTGC17qzLQRvwTPex`"],"name":["`Resource`:`grn`:`grn:gg:person:inAo9SoaSeY0t7lUxQ1mOEsvnERWTGC17qzLQRvwTPex`"],"title":["`Resource`:`grn`:`grn:gg:person:inAo9SoaSeY0t7lUxQ1mOEsvnERWTGC17qzLQRvwTPex`"]}},"createdNodes":{"`Resource`:`grn`:`grn:gg:person:inAo9SoaSeY0t7lUxQ1mOEsvnERWTGC17qzLQRvwTPex`":{"action":"ADDED"}},"transactionId":125}}```
Now that your txData is saved as a parameter you can test the Geequel query in your notification policy to more efficiently debug it! We did this as we went along
in the tutorial, you may recognize:
WITH {txData} AS txData WITH txData.assignedNodeProperties.byLabel.Person AS event, txData UNWIND KEYS(event) AS key WITH key,event[key] AS changes UNWIND changes AS change RETURN change
Use the txData param to test out your notification graph query. Once you're able to return the results you're looking for, be sure to resave the policy with the
updated query before activating it again.
Summary: How to get txData to test your policy query
- Deactivate the policy that you're trying to test.
- Make the change in the graph that should trigger the notification.
- Login to RabbitMQ and navigate to the
com.graphgrid.fuze.queueunder the "Queues" tab. - View the message in the queue. Copy the "Payload" this is the
txData. - Create a parameter in ONgDB called
txData.:params {txData: paste txData from RabbitMQ message here}. - Test your policy query!